vpn-wireguard.md
概览
vpn产品系列

wireguad 快速开始
功能描述:3台机器基本信息如下

hostname   LAN              WLAN           System
node1      10.255.20.218    117.51.149.5   CentOS7.8
node2      192.168.1.112    NAT            CentOS7.8
node3      192.168.1.113    NAT            CentOS7.8

我这里node1是一台滴滴云上面的服务器,拥有独立公网IP,node2和node3都我用virtualbox开的虚拟机,没有公网IP,我们的目标是给三台机器都"新增一个内网IP地址",分别是
node1 10.200.200.1
node2 10.200.200.2
node3 10.200.200.3
通过wireguard来实现

############################ 三台机器都安装上wireguard ############################################################

提前准备好epel和base的yum源
yum update -y
yum install https://www.elrepo.org/elrepo-release-7.el7.elrepo.noarch.rpm -y
yum install yum-plugin-elrepo -y
yum install kmod-wireguard wireguard-tools -y
安装完成之后重启机器

安装前最好更新系统,wireguard希望系统内核越高越好,安装完毕后最好重启下机器,否则后面操作网络接口的时候可能会有权限不足的报错(CentOS8无此问题)

=========================================================================================================
 Package                           Arch              Version                        Repository      Size
=========================================================================================================
Installing:
 kmod-wireguard                    x86_64            1.0.20200506-1.el7_8.elrepo    elrepo         101 k
 wireguard-tools                   x86_64            1.0.20200319-1.el7             epel           118 k
Installing for dependencies:
 libtirpc                          x86_64            0.2.4-0.16.el7                 base            89 k
 python3                           x86_64            3.6.8-13.el7                   base            69 k
 python3-libs                      x86_64            3.6.8-13.el7                   base           7.0 M
 python3-pip                       noarch            9.0.3-7.el7_7                  updates        1.8 M
 python3-setuptools                noarch            39.2.0-10.el7                  base           629 k

Transaction Summary
=========================================================================================================

##################################### 三台机器都生成好公钥和私钥备用 ####################################################

命令速览
mkdir -p /root/wireguard-vpn-key && cd /root/wireguard-vpn-key
wg genkey | tee privatekey | wg pubkey > publickey
chmod 400 *
cat publickey
cat privatekey

具体3台机器对操作如下:

[root@node1 ~]# mkdir /root/wireguard-vpn-key && cd /root/wireguard-vpn-key
[root@node1 wireguard-vpn-key]# wg genkey | tee privatekey | wg pubkey > publickey
[root@node1 wireguard-vpn-key]# ls
privatekey  publickey
[root@node1 wireguard-vpn-key]# chmod 400 *
[root@node1 wireguard-vpn-key]# cat publickey
C9tpanjKEZmQYYxc2Ej5mRK73jewMoAuAHielL2u4Hs=
[root@node1 wireguard-vpn-key]# cat privatekey
AGSDAksI6cSPShdH3mvrNO9svQJKwT1GXa50B76krGo=


[root@node2 ~]# mkdir -p /root/wireguard-vpn-key && cd /root/wireguard-vpn-key
[root@node2 wireguard-vpn-key]# wg genkey | tee privatekey | wg pubkey > publickey
[root@node2 wireguard-vpn-key]# chmod 400 *
[root@node2 wireguard-vpn-key]# cat publickey
xnXgKBj6V6T2eDLHFVp2V8tT+6m1jZiYx8MstQTvATw=
[root@node2 wireguard-vpn-key]# cat privatekey
MJqkUtHG5Mkd5nIDvBe+676K5AUR146L7l+1WjhnEm0=


[root@node3 ~]# mkdir -p /root/wireguard-vpn-key && cd /root/wireguard-vpn-key
[root@node3 wireguard-vpn-key]# wg genkey | tee privatekey | wg pubkey > publickey
[root@node3 wireguard-vpn-key]# chmod 400 *
[root@node3 wireguard-vpn-key]# cat publickey
+PjUN8EiT8fJCbUJLOlju6sLDYDTDSirPNeeFplWcho=
[root@node3 wireguard-vpn-key]# cat privatekey
8GW2i9Vtn4vbWyLLSJhYU4PFKvkYLNHJbRVOCN5Qi1M=

先生成私钥,再根据私钥生成公钥,一份私钥对应唯一一份公钥

实际配置中,注意私钥的保密,后面我会在需要配置私钥和公钥的地方直接粘贴,大家可以对照着这里确认使用的是哪台机器上的公钥或私钥

##################################### 配置node1为server端 ###################################################################

wireguard 官方没有用server 和 client的概念,用的是peer,不过我们这里还是用server和client来方便理解,有公网的这台机器作为server,也可以称之为中继服务器(relay server)

# to enable kernel relaying/forwarding ability on bounce servers
echo "net.ipv4.ip_forward = 1" >> /etc/sysctl.conf
echo "net.ipv4.conf.all.proxy_arp = 1" >> /etc/sysctl.conf
sudo sysctl -p /etc/sysctl.conf


mkdir -p /etc/wireguard
touch /etc/wireguard/wg0.conf
chmod 600 /etc/wireguard/wg0.conf

cat << 'EOF' > /etc/wireguard/wg0.conf
[Interface]
Address = 10.200.200.1/24
ListenPort = 51820
#local private key
PrivateKey = AGSDAksI6cSPShdH3mvrNO9svQJKwT1GXa50B76krGo=

# note - substitute eth0 in the following lines to match the Internet-facing interface
# if the server is behind a router and receive traffic via NAT, this iptables rules are not needed
PostUp = iptables -A FORWARD -i %i -j ACCEPT; iptables -t nat -A POSTROUTING -o eth0 -j MASQUERADE
PostDown = iptables -D FORWARD -i %i -j ACCEPT; iptables -t nat -D POSTROUTING -o eth0 -j MASQUERADE

[Peer]
#node2 public key
PublicKey = xnXgKBj6V6T2eDLHFVp2V8tT+6m1jZiYx8MstQTvATw=
AllowedIPs = 10.200.200.2/32

#node3 public key
[Peer]
PublicKey = +PjUN8EiT8fJCbUJLOlju6sLDYDTDSirPNeeFplWcho=
AllowedIPs = 10.200.200.3/32
EOF

#################################################### 配置node2为client端 ######################################
mkdir -p /etc/wireguard
touch /etc/wireguard/wg0.conf
chmod 600 /etc/wireguard/wg0.conf

cat /etc/wireguard/wg0.conf
[Interface]
Address = 10.200.200.2/32
#local private key
PrivateKey = MJqkUtHG5Mkd5nIDvBe+676K5AUR146L7l+1WjhnEm0=

[Peer]
# server public key
PublicKey = C9tpanjKEZmQYYxc2Ej5mRK73jewMoAuAHielL2u4Hs=
AllowedIPs = 0.0.0.0/0, ::/0
# node1 waln ip
Endpoint = 117.51.149.5:51820

################################################ 配置node3为client端 ###########################################

mkdir -p /etc/wireguard
touch /etc/wireguard/wg0.conf
chmod 600 /etc/wireguard/wg0.conf

cat /etc/wireguard/wg0.conf
[Interface]
Address = 10.200.200.3/32
#local private key
PrivateKey = 8GW2i9Vtn4vbWyLLSJhYU4PFKvkYLNHJbRVOCN5Qi1M=

[Peer]
# server public key
PublicKey = C9tpanjKEZmQYYxc2Ej5mRK73jewMoAuAHielL2u4Hs=
AllowedIPs = 0.0.0.0/0, ::/0
# node1 waln ip
Endpoint = 117.51.149.5:51820

###################################################### 启动3台机器上的wireguard服务 ##########################

systemctl status wg-quick@wg0.service
systemctl start wg-quick@wg0.service
systemctl enable wg-quick@wg0.service

####################################################### 测试验证 ###########################################

[root@node1 ~]# ip addr
1: lo: <LOOPBACK,UP,LOWER_UP> mtu 65536 qdisc noqueue state UNKNOWN group default qlen 1000
    link/loopback 00:00:00:00:00:00 brd 00:00:00:00:00:00
    inet 127.0.0.1/8 scope host lo
       valid_lft forever preferred_lft forever
2: eth0: <BROADCAST,MULTICAST,UP,LOWER_UP> mtu 1500 qdisc pfifo_fast state UP group default qlen 1000
    link/ether 00:05:69:d3:55:f6 brd ff:ff:ff:ff:ff:ff
    inet 10.255.20.218/24 brd 10.255.20.255 scope global eth0
       valid_lft forever preferred_lft forever
6: wg0: <POINTOPOINT,NOARP,UP,LOWER_UP> mtu 1420 qdisc noqueue state UNKNOWN group default qlen 1000
    link/none
    inet 10.200.200.1/24 scope global wg0
       valid_lft forever preferred_lft forever

[root@node2 ~]# ip addr
1: lo: <LOOPBACK,UP,LOWER_UP> mtu 65536 qdisc noqueue state UNKNOWN group default qlen 1000
    link/loopback 00:00:00:00:00:00 brd 00:00:00:00:00:00
    inet 127.0.0.1/8 scope host lo
       valid_lft forever preferred_lft forever
    inet6 ::1/128 scope host
       valid_lft forever preferred_lft forever
2: eth0: <BROADCAST,MULTICAST,UP,LOWER_UP> mtu 1500 qdisc pfifo_fast state UP group default qlen 1000
    link/ether 08:00:27:e7:02:84 brd ff:ff:ff:ff:ff:ff
    inet 192.168.1.112/24 brd 192.168.1.255 scope global eth0
       valid_lft forever preferred_lft forever
    inet6 2408:8207:7893:1350:a00:27ff:fee7:284/64 scope global mngtmpaddr dynamic
       valid_lft 259193sec preferred_lft 172793sec
    inet6 fe80::a00:27ff:fee7:284/64 scope link
       valid_lft forever preferred_lft forever
3: wg0: <POINTOPOINT,NOARP,UP,LOWER_UP> mtu 1420 qdisc noqueue state UNKNOWN group default qlen 1000
    link/none
    inet 10.200.200.2/32 scope global wg0
       valid_lft forever preferred_lft forever
    inet6 fe80::be60:42c8:a1bb:8a73/64 scope link flags 800
       valid_lft forever preferred_lft forever

[root@node1 ~]# wg
interface: wg0
  public key: C9tpanjKEZmQYYxc2Ej5mRK73jewMoAuAHielL2u4Hs=
  private key: (hidden)
  listening port: 51820

peer: xnXgKBj6V6T2eDLHFVp2V8tT+6m1jZiYx8MstQTvATw=
  endpoint: 123.112.21.151:50480
  allowed ips: 10.200.200.2/32
  latest handshake: 20 seconds ago
  transfer: 148 B received, 124 B sent

[root@node2 ~]# wg
interface: wg0
  public key: xnXgKBj6V6T2eDLHFVp2V8tT+6m1jZiYx8MstQTvATw=
  private key: (hidden)
  listening port: 50480
  fwmark: 0xca6c

peer: C9tpanjKEZmQYYxc2Ej5mRK73jewMoAuAHielL2u4Hs=
  endpoint: 117.51.149.5:51820
  allowed ips: 0.0.0.0/0, ::/0
  latest handshake: 28 seconds ago
  transfer: 348 B received, 612 B sent


[root@node2 ~]# ping 10.200.200.1
PING 10.200.200.1 (10.200.200.1) 56(84) bytes of data.
64 bytes from 10.200.200.1: icmp_seq=1 ttl=64 time=5.17 ms
64 bytes from 10.200.200.1: icmp_seq=2 ttl=64 time=9.84 ms
64 bytes from 10.200.200.1: icmp_seq=3 ttl=64 time=7.91 ms
64 bytes from 10.200.200.1: icmp_seq=4 ttl=64 time=5.19 ms
64 bytes from 10.200.200.1: icmp_seq=5 ttl=64 time=4.48 ms
64 bytes from 10.200.200.1: icmp_seq=6 ttl=64 time=5.71 ms
^C
--- 10.200.200.1 ping statistics ---
6 packets transmitted, 6 received, 0% packet loss, time 5009ms
rtt min/avg/max/mdev = 4.489/6.388/9.841/1.882 ms


[root@node1 ~]# ping 10.200.200.2
PING 10.200.200.2 (10.200.200.2) 56(84) bytes of data.
64 bytes from 10.200.200.2: icmp_seq=1 ttl=64 time=3.59 ms
64 bytes from 10.200.200.2: icmp_seq=2 ttl=64 time=4.20 ms
64 bytes from 10.200.200.2: icmp_seq=3 ttl=64 time=2.99 ms
64 bytes from 10.200.200.2: icmp_seq=4 ttl=64 time=4.40 ms
64 bytes from 10.200.200.2: icmp_seq=5 ttl=64 time=4.29 ms
64 bytes from 10.200.200.2: icmp_seq=6 ttl=64 time=4.86 ms
64 bytes from 10.200.200.2: icmp_seq=7 ttl=64 time=3.98 ms
^C
--- 10.200.200.2 ping statistics ---
7 packets transmitted, 7 received, 0% packet loss, time 6009ms
rtt min/avg/max/mdev = 2.991/4.049/4.868/0.563 ms
配置windows客户端
1 在官网下载windows gui客户端软件
2 配置
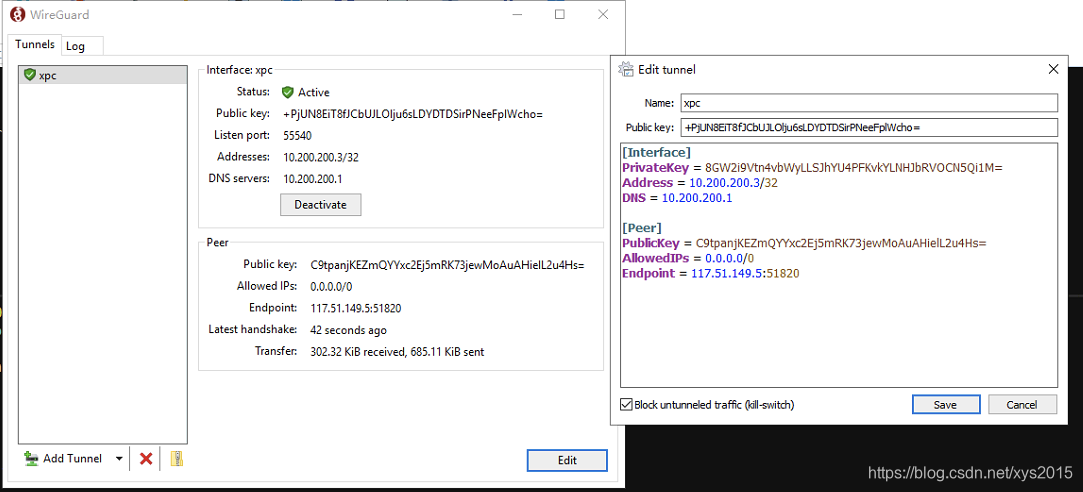
3 验证
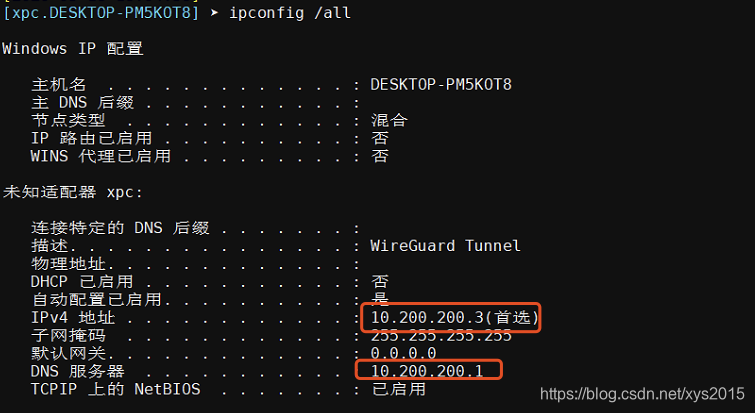
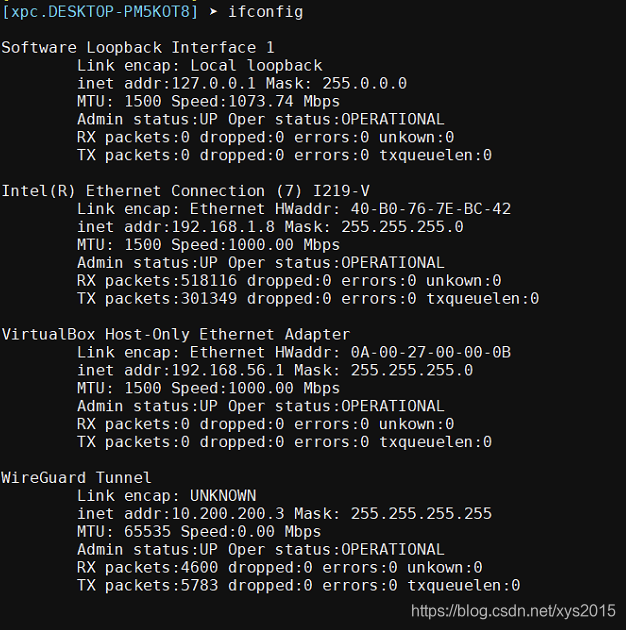
ping 10.200.200.1
参考资料
https://raw.githubusercontent.com/Nyr/openvpn-install/master/openvpn-install.sh

https://linuxize.com/post/how-to-set-up-an-openvpn-server-on-centos-7/

https://openvpn.net/pricing/?p=software-packages

https://github.com/kylemanna/docker-openvpn

https://openvpn.net/community-downloads/

openvpn也可以容器安装

6 open source tools for making your own VPN
https://opensource.com/article/18/8/open-source-tools-vpn

https://blog.trailofbits.com/2016/12/12/meet-algo-the-vpn-that-works/

什么是 WireGuard?为什么 Linux 用户为它疯狂?
WireGuard 是一个易于配置、快速且安全的开源 VPN,它利用了最新的加密技术。目的是提供一种更快、更简单、更精简的通用 VPN,它可以轻松地在树莓派这类低端设备到高端服务器上部署。
https://zhuanlan.zhihu.com/p/108365587?from=timeline

https://en.wikipedia.org/wiki/WireGuard

https://www.makeuseof.com/tag/wireguard-vs-openvpn/

https://www.makeuseof.com/tag/major-vpn-protocols-explained/

https://www.wireguard.com/quickstart/

WireGuard代理与ss机场优劣比较
https://since1989.org/wireguard/ssr-speed-tcp-udp.html

https://docs.sweeting.me/s/wireguard

https://wiki.archlinux.org/index.php/WireGuard#Specific_use-case:_VPN_server

https://golb.hplar.ch/2019/07/wireguard-windows.html
csdn 112970894