systemctl
概览
几乎每个服务都有这么几个共同的操作,启动,停止,重启,配置开机自启,老一点的操作系统如CentOS6用的是sysV,而新的操作系统如CentOS7,Ubuntu14+,用的都是systemd
CentOS6系统上管理开机自启,说白了就是纯shell脚本的模式,启动脚本都放在/etc/init.d下面,这种方式比较繁琐,如果想要自己书写这种类型的shell脚本,需要大量的shell代码要写,当让好处就是不需要学习新的知识,掌握了shell脚本也就掌握了这种管理开机自启服务的模式
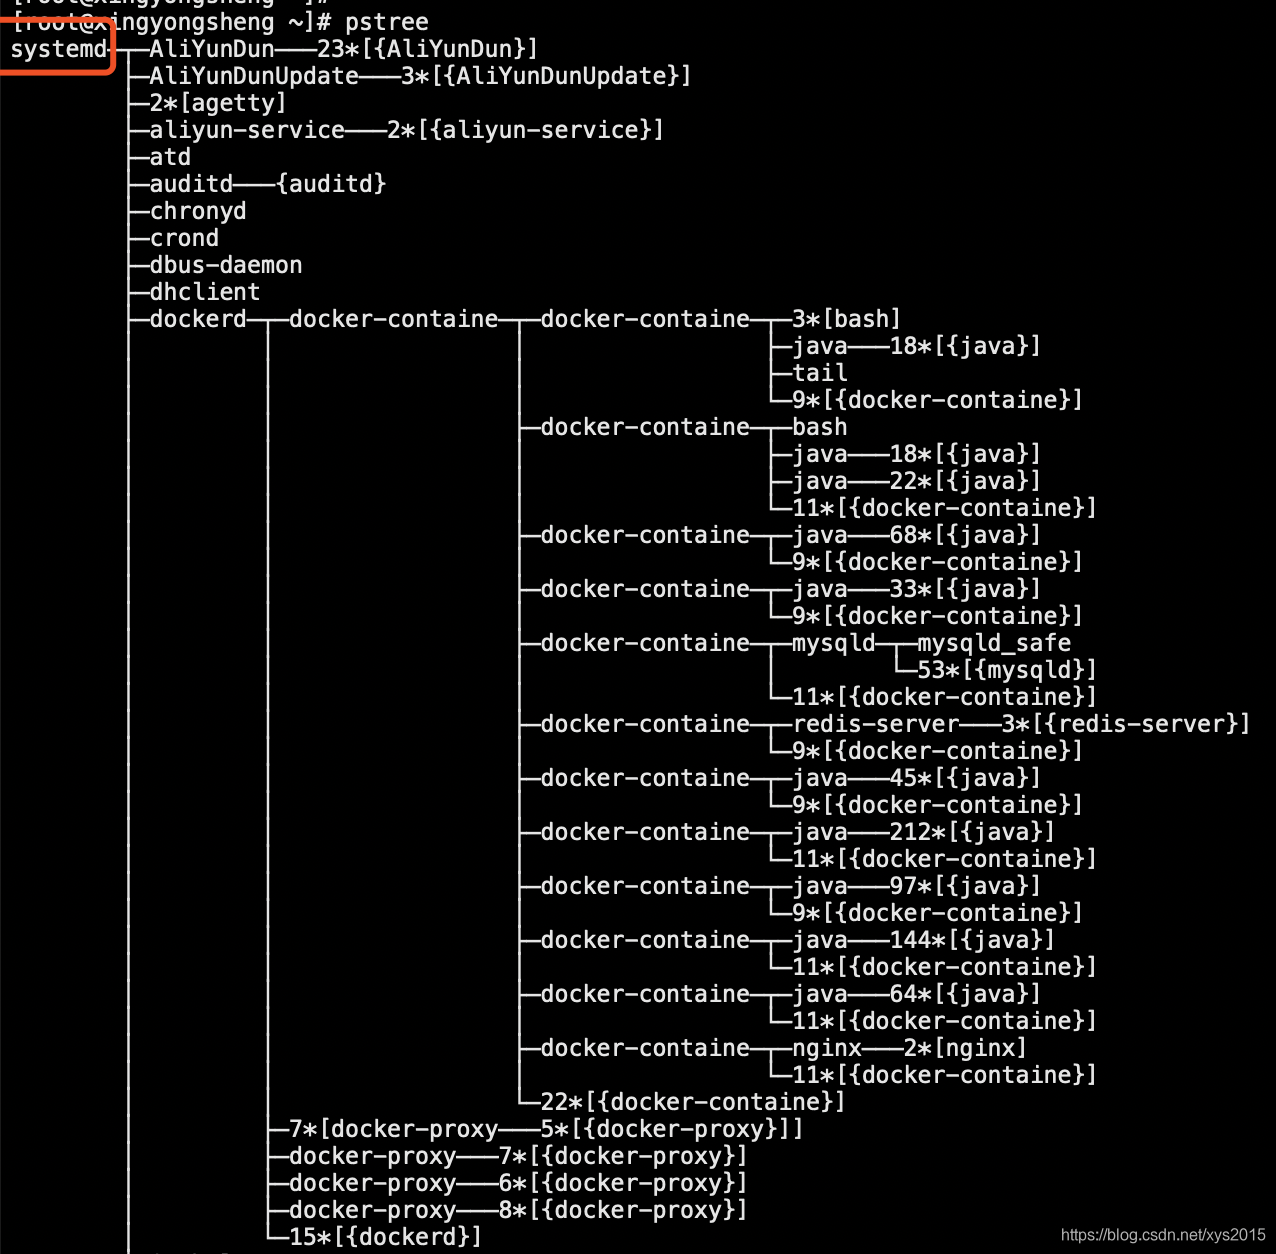
用pstree命令可以看到系统的第1个进程,进程pid是1,如下是CentOS7下面的截图
systemd用起来不复杂,掌握了一定的规则后,书写systemd开机脚本也很方便,不过systemd与系统是强耦合的,需要用到较高的权限,比如在docker容器里要想用systemd,需要做不少额外的操作
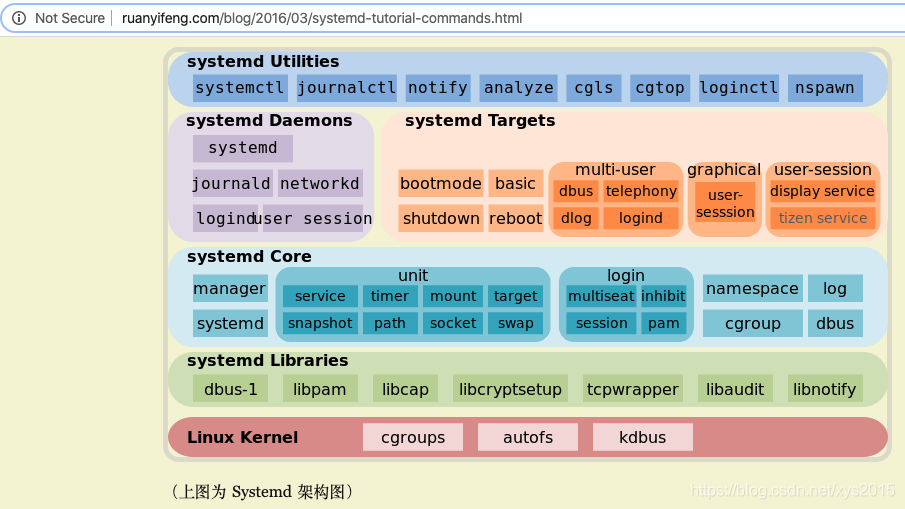
systemd架构图如下
Fedora最先使用Systemd
实践场景举例
一般情况下在支持systemctl管理的操作系统中,如果我们使用包管理工具安装软件,系统会自动生成管理服务需要配置文件,下面是在CentOS7操作系统下,安装nginx服务的演示
1 安装
yum install nginx

2 启动服务
systemctl start nginx

3 查看服务状态
[root@node1 ~]# systemctl status nginx
● nginx.service - The nginx HTTP and reverse proxy server
   Loaded: loaded (/usr/lib/systemd/system/nginx.service; disabled; vendor preset: disabled)
   Active: active (running) since Mon 2020-03-23 11:34:46 CST; 4s ago
  Process: 3804 ExecStart=/usr/sbin/nginx (code=exited, status=0/SUCCESS)
  Process: 3801 ExecStartPre=/usr/sbin/nginx -t (code=exited, status=0/SUCCESS)
  Process: 3800 ExecStartPre=/usr/bin/rm -f /run/nginx.pid (code=exited, status=0/SUCCESS)
 Main PID: 3806 (nginx)
    Tasks: 2
   Memory: 9.9M
   CGroup: /system.slice/nginx.service
           ├─3806 nginx: master process /usr/sbin/nginx
           └─3807 nginx: worker process

Mar 23 11:34:46 node1 systemd[1]: Starting The nginx HTTP and reverse proxy server...
Mar 23 11:34:46 node1 nginx[3801]: nginx: the configuration file /etc/nginx/nginx.conf syntax is ok
Mar 23 11:34:46 node1 nginx[3801]: nginx: configuration file /etc/nginx/nginx.conf test is successful
Mar 23 11:34:46 node1 systemd[1]: Failed to read PID from file /run/nginx.pid: Invalid argument
Mar 23 11:34:46 node1 systemd[1]: Started The nginx HTTP and reverse proxy server.

4 设置服务开机自启
systemctl enable nginx

5 检查服务是否已经开机自启
[root@node1 ~]# systemctl list-unit-files | grep nginx
nginx.service                                 enabled

6 上面的查看状态里,有一个关键的配置文件
[root@node1 ~]# cat /usr/lib/systemd/system/nginx.service
[Unit]
Description=The nginx HTTP and reverse proxy server
After=network.target remote-fs.target nss-lookup.target

[Service]
Type=forking
PIDFile=/run/nginx.pid
# Nginx will fail to start if /run/nginx.pid already exists but has the wrong
# SELinux context. This might happen when running `nginx -t` from the cmdline.
# https://bugzilla.redhat.com/show_bug.cgi?id=1268621
ExecStartPre=/usr/bin/rm -f /run/nginx.pid
ExecStartPre=/usr/sbin/nginx -t
ExecStart=/usr/sbin/nginx
ExecReload=/bin/kill -s HUP $MAINPID
KillSignal=SIGQUIT
TimeoutStopSec=5
KillMode=process
PrivateTmp=true

[Install]
WantedBy=multi-user.target
这份配置文件是我们使用yum安装时系统自动帮我们配置好的,因为有了这个配置文件,我们才能用systemctl命令来管理我们的nginx服务,相信对nginx服务比较熟悉对朋友已经大致看出上面文件的功能,如果我们不是用yum等包管理工具来安装的,比如二进制安装的软件,也想使用systemctl来管理,就需要我们自己书写这个配置文件了,一般比较完善的线上文档,如docker官方文档,会给出一份参考的配置文件,然后我们根据需要来修改,后面我们会再介绍这份配置文件的详细含义
常用命令
systemctl status nginx.service  OR systemctl status nginx
systemctl stop nginx
systemctl start nginx
systemctl restart nginx

systemctl reload nginx.service    当我们手动修改过类似 /usr/lib/systemd/system/nginx.service 配置文件,需要重载配置文件
systemctl daemon-reload           重载所有修改过的配置文件
配置文件含义解释
1 如何找到某个服务对应配置文件的路径 ?
systemctl cat nginx.service
systemctl status nginx.service
2 配置文件可以被分成哪几部分 ?

3 配置文件常见区块细节
[Unit]区块通常是配置文件的第一个区块,用来定义 Unit 的元数据,以及配置与其他 Unit 的关系。它的主要字段如下。
Description:简短描述
Documentation:文档地址
Requires:当前 Unit 依赖的其他 Unit,如果它们没有运行,当前 Unit 会启动失败
Wants:与当前 Unit 配合的其他 Unit,如果它们没有运行,当前 Unit 不会启动失败
BindsTo:与Requires类似,它指定的 Unit 如果退出,会导致当前 Unit 停止运行
Before:如果该字段指定的 Unit 也要启动,那么必须在当前 Unit 之后启动
After:如果该字段指定的 Unit 也要启动,那么必须在当前 Unit 之前启动
Conflicts:这里指定的 Unit 不能与当前 Unit 同时运行
Condition...:当前 Unit 运行必须满足的条件,否则不会运行
Assert...:当前 Unit 运行必须满足的条件,否则会报启动失败


[Install]通常是配置文件的最后一个区块,用来定义如何启动,以及是否开机启动。它的主要字段如下。
WantedBy:它的值是一个或多个 Target,当前 Unit 激活时(enable)符号链接会放入/etc/systemd/system目录下面以 Target 名 + .wants后缀构成的子目录中
RequiredBy:它的值是一个或多个 Target,当前 Unit 激活时,符号链接会放入/etc/systemd/system目录下面以 Target 名 + .required后缀构成的子目录中
Alias:当前 Unit 可用于启动的别名
Also:当前 Unit 激活(enable)时,会被同时激活的其他 Unit


[Service]区块用来 Service 的配置,只有 Service 类型的 Unit 才有这个区块。它的主要字段如下。
Type:定义启动时的进程行为。它有以下几种值。
Type=simple:默认值,执行ExecStart指定的命令,启动主进程
Type=forking:以 fork 方式从父进程创建子进程,创建后父进程会立即退出
Type=oneshot:一次性进程,Systemd 会等当前服务退出,再继续往下执行
Type=dbus:当前服务通过D-Bus启动
Type=notify:当前服务启动完毕,会通知Systemd,再继续往下执行
Type=idle:若有其他任务执行完毕,当前服务才会运行
ExecStart:启动当前服务的命令
ExecStartPre:启动当前服务之前执行的命令
ExecStartPost:启动当前服务之后执行的命令
ExecReload:重启当前服务时执行的命令
ExecStop:停止当前服务时执行的命令
ExecStopPost:停止当其服务之后执行的命令
RestartSec:自动重启当前服务间隔的秒数
Restart:定义何种情况 Systemd 会自动重启当前服务,可能的值包括always(总是重启)、on-success、on-failure、on-abnormal、on-abort、on-watchdog
TimeoutSec:定义 Systemd 停止当前服务之前等待的秒数
Environment:指定环境变量


Unit 配置文件的完整字段清单,请参考官方文档
https://www.freedesktop.org/software/systemd/man/systemd.unit.html
日志管理 - journalctl
使用systemctl启动的服务,除了可以在/var/log/messages上看到日志,还可以直接使用journalctl来更方便的查看
# 查看指定时间的日志
$ sudo journalctl --since="2012-10-30 18:17:16"
$ sudo journalctl --since "20 min ago"
$ sudo journalctl --since yesterday
$ sudo journalctl --since "2015-01-10" --until "2015-01-11 03:00"
$ sudo journalctl --since 09:00 --until "1 hour ago"


# 查看某个 Unit 的日志
$ sudo journalctl -u nginx.service
# 实时滚动显示某个 Unit 的最新日志
$ sudo journalctl -u nginx.service -f


# 查看指定优先级(及其以上级别)的日志,共有8级
# 0: emerg
# 1: alert
# 2: crit
# 3: err
# 4: warning
# 5: notice
# 6: info
# 7: debug
$ sudo journalctl -p err -b


# 日志默认分页输出,--no-pager 改为正常的标准输出
$ sudo journalctl --no-pager

# 以 JSON 格式(多行)输出,可读性更好
$ sudo journalctl -b -u nginx.serviceqq -o json-pretty

# 显示日志占据的硬盘空间
$ sudo journalctl --disk-usage
参考链接
http://www.ruanyifeng.com/blog/2016/03/systemd-tutorial-commands.html
http://www.ruanyifeng.com/blog/2016/03/systemd-tutorial-part-two.html
https://www.freedesktop.org/software/systemd/man/systemd.unit.html

https://www.tecmint.com/best-linux-init-systems/

https://fedoraproject.org/wiki/Systemd

The Story Behind: Why ‘init’ Needed to be Replaced with ‘systemd’ in Linux
https://www.tecmint.com/systemd-replaces-init-in-linux/
csdn 111677685