ubuntu-基本使用
概览
配置文件下载软件更新仓库为阿里云
更改以下文件的内容即可
root@as4k-VirtualBox:~# cat /etc/apt/sources.list
deb http://mirrors.aliyun.com/ubuntu/ bionic main restricted universe multiverse
deb-src http://mirrors.aliyun.com/ubuntu/ bionic main restricted universe multiverse

deb http://mirrors.aliyun.com/ubuntu/ bionic-security main restricted universe multiverse
deb-src http://mirrors.aliyun.com/ubuntu/ bionic-security main restricted universe multiverse

deb http://mirrors.aliyun.com/ubuntu/ bionic-updates main restricted universe multiverse
deb-src http://mirrors.aliyun.com/ubuntu/ bionic-updates main restricted universe multiverse

deb http://mirrors.aliyun.com/ubuntu/ bionic-proposed main restricted universe multiverse
deb-src http://mirrors.aliyun.com/ubuntu/ bionic-proposed main restricted universe multiverse

deb http://mirrors.aliyun.com/ubuntu/ bionic-backports main restricted universe multiverse
deb-src http://mirrors.aliyun.com/ubuntu/ bionic-backports main restricted universe multiverse
可以使用 gedit /etc/apt/sources.list
或者 vi /etc/apt/sources.list 来更改


## 时间相关命令
`cal` 显示月历
`cal -y` 显示年历
`date` 显示当前时间
## Ubuntu Linux文件及目录不同颜色所代表的含义
1. 黑色(默认) 普通文件
2. 蓝色 目录
3. 绿色 可执行文件
4. 红色 压缩文件
5. 水红色 图像文件
6. 青色 链接文件(相当于快捷方式)
7. 黄色 设备文件
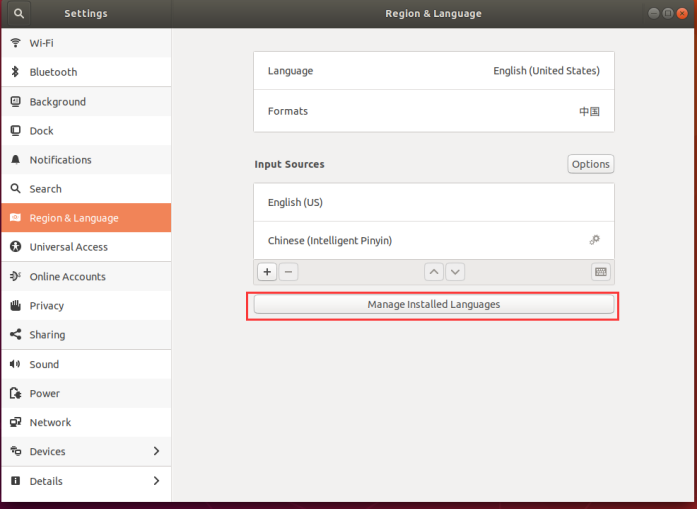
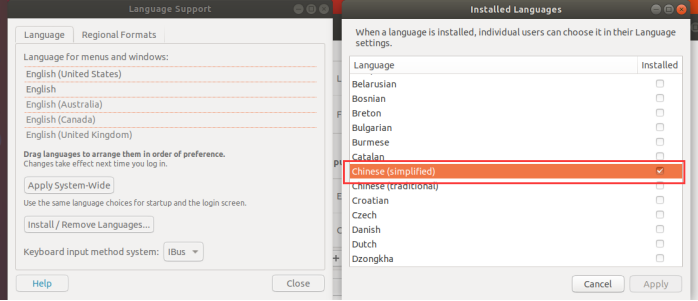
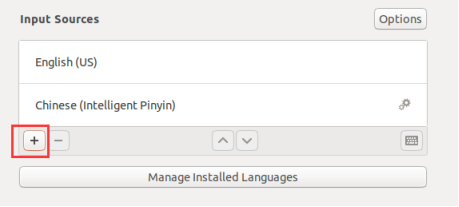
添加中文输入法
步骤1 安装中文语言包


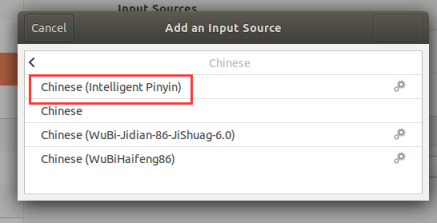
步骤2 添加中文拼音输入法


如果在这一步中,并没有显示Chinese(Intelligent Pinyin),则卸载中文语言包,尝试重新安装。
普通用户与root用户切换
`whoami` 检测自己是谁
`sudo 命令` 以管理员身份执行次命令
`su username` 切换用户(root切换到其它用户不需要密码,否则则需要相应用户的密码)
在Ubuntu Linux中,要想实现切换到root,现需要激活root。没有被激活的root没有密码,激活可以认为
就是为root添加密码。
在Ubuntu下,并且处于**普通用户下**激活与锁定root用户的命令如下:
    `sudo passwd root` 接下来连续输入两次想要设置root密码即可
    `sudo passwd -l root` 锁定root用户,并且清楚原先root用户的密码,此时已经不能再使用su切换到
root用户了。

su - root # 输入密码之后可切换到root
Ubuntu Docker 仓库配置
$ docker run -ti ubuntu:18.04 /bin/bash
root@7d93de07bf76:/# cat /etc/os-release

当试图直接使用 apt-get 安装一个软件的时候,会提示 E: Unable to locate package。
这并非系统不支持 apt-get 命令。Docker 镜像在制作时为了精简清除了 apt 仓库信息,因此需要先执行 apt-get update 命令来更新仓库信息。更新信息后即可成功通过 apt-get 命令来安装软件。

apt-get update
apt-get install curl
Docker Ubuntu 内使用定时任务 cron
apt-get update
apt-get install cron
apt-get install vi

crontab -e  # 打开定时任务编辑页面,增加如下内容
* * * * * /bin/date >> /tmp/tmp.txt

/usr/sbin/cron # 启动
等待一分钟左右,查看 /tmp/tmp.txt

参考: http://manpages.ubuntu.com/manpages/xenial/man8/cron.8.html
注意:不要使用 cron -f 来启动cron服务;定时任务里面的命令最好都用绝对路径;定时任务的输出要么定向到文件要么定向到空,防止磁盘被占满
相关链接
Ubuntu 18.04.4 LTS (Bionic Beaver)
https://ubuntu.com/
ubuntu18.04获取root权限并用root用户登录
https://www.cnblogs.com/masbay/p/10744900.html